把flutter作为framework添加到已存在的iOS中
文章目录
之前写了一篇关于如何将 flutter 直接打包成 android aar 的文章, 本篇写一写如何将 flutter 打包成 framework 以便于直接让没有 flutter 环境的 iOS 开发者使用, 因为国内很多项目都有这样的要求
本篇并不会做完全的工程集成化, 只是做一下如何将 flutter 的 framework 打出来, 并且置入到 iOS 原生工程中, 因为各项目一定户会有自己的特殊性, 不可能完全一样
本篇打包脚本部分参考了 的内容,但是又有一些针对 flutter 版本的变化和 flutter type 不同的情况进行的修改, 不观看连接中的内容并不会影响观看
开发环境
MacOS
XCode 10
git
flutter 及 flutter 的相关工具链
cocoapods
创建几个工程
iOS 原生工程
使用 xcode 创建
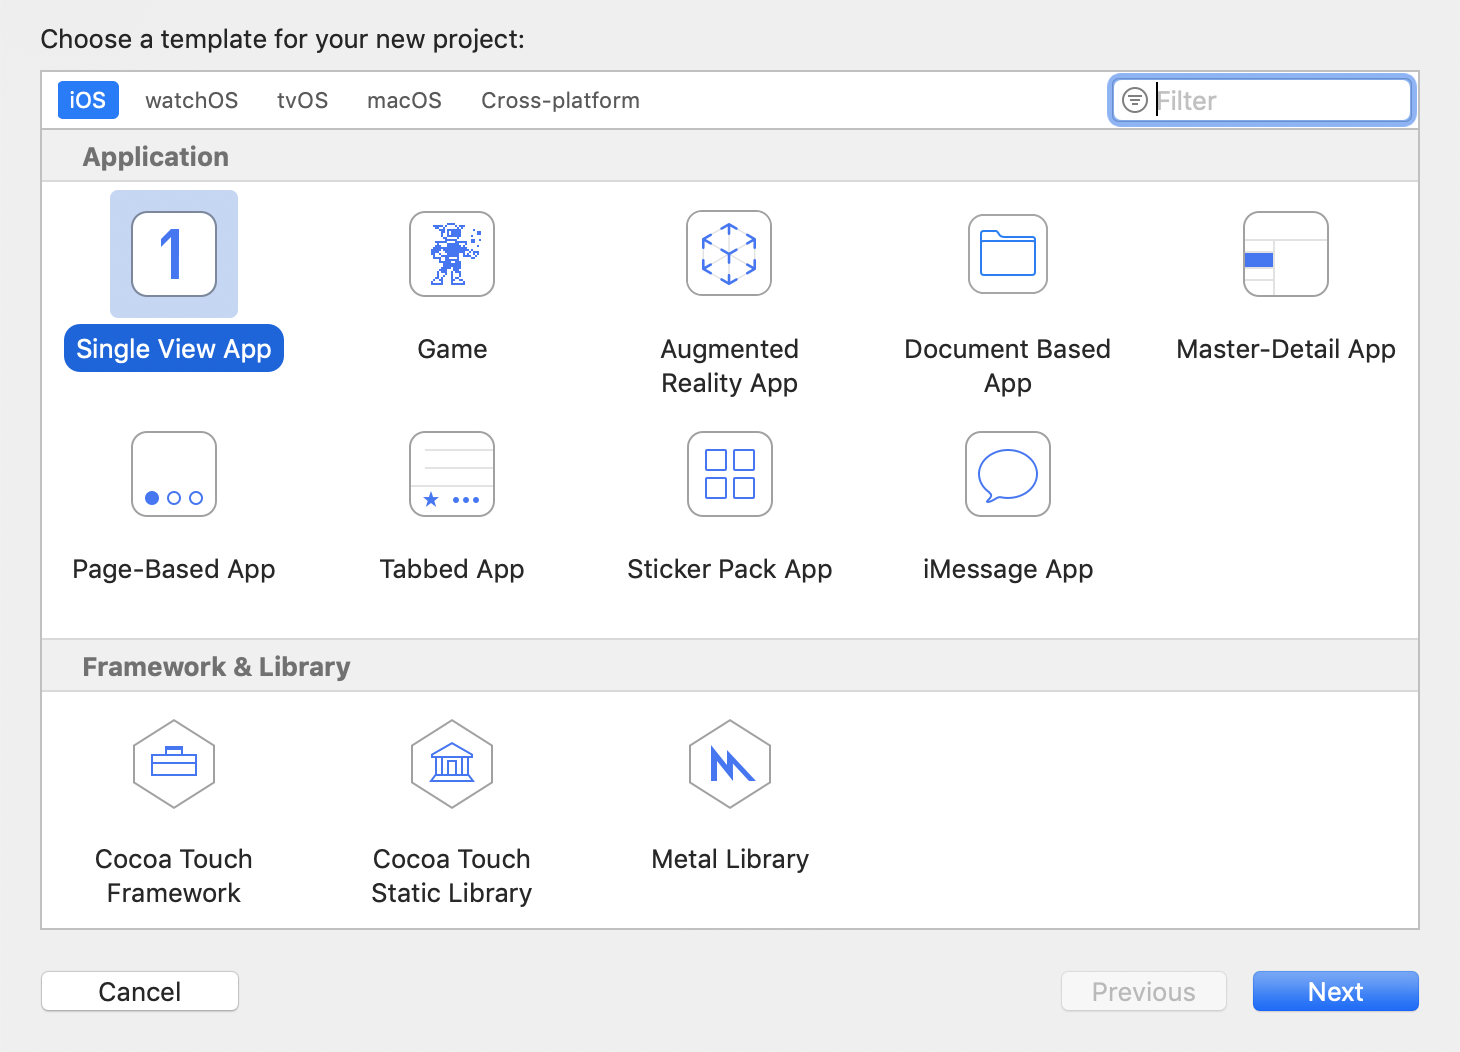
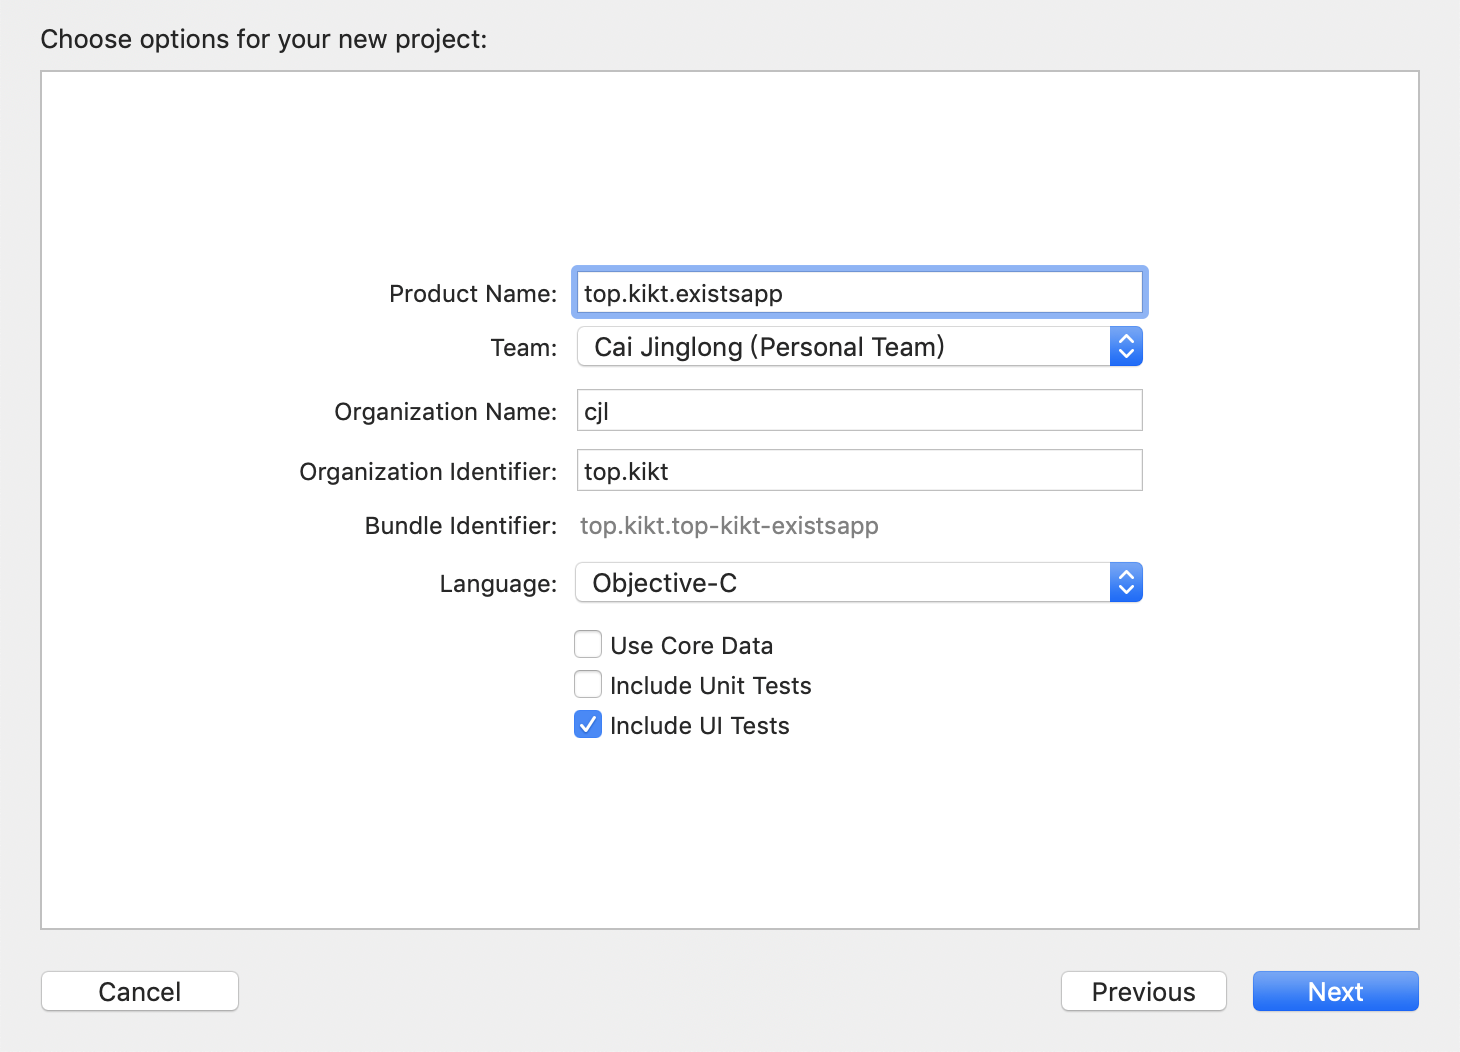
这个原生工程就是模拟你的原有工程
Flutter 工程
这里我只使用 flutter module 的方式, 如果你 flutter 是 app 的方式创建的,则打包脚本的内容需要根据应用结构有所调整
$ flutter create -t module flutter_module_for_ios
这次直接在里面添加一个带有原生功能的插件, 和 android 篇相同依然选择 那个插件
修改 pubspec.yaml:
1dependencies:
2  shared_preferences: ^0.5.3+1
创建脚本
观察结构
打包 iOS,然后观察 build 文件夹
1flutter packages get
2flutter build ios --release --no-codesign
 1tree build/ios/Release-iphoneos
 2build/ios/Release-iphoneos
 3├── FlutterPluginRegistrant
 4│   └── libFlutterPluginRegistrant.a
 5├── Runner.app
 6│   ├── AppIcon20x20@2x.png
 7│   ├── AppIcon20x20@2x~ipad.png
 8│   ├── AppIcon20x20@3x.png
 9│   ├── AppIcon20x20~ipad.png
10│   ├── AppIcon29x29.png
11│   ├── AppIcon29x29@2x.png
12│   ├── AppIcon29x29@2x~ipad.png
13│   ├── AppIcon29x29@3x.png
14│   ├── AppIcon29x29~ipad.png
15│   ├── AppIcon40x40@2x.png
16│   ├── AppIcon40x40@2x~ipad.png
17│   ├── AppIcon40x40@3x.png
18│   ├── AppIcon40x40~ipad.png
19│   ├── AppIcon60x60@2x.png
20│   ├── AppIcon60x60@3x.png
21│   ├── AppIcon76x76@2x~ipad.png
22│   ├── AppIcon76x76~ipad.png
23│   ├── AppIcon83.5x83.5@2x~ipad.png
24│   ├── Assets.car
25│   ├── Base.lproj
26│   │   ├── LaunchScreen.storyboardc
27│   │   │   ├── 01J-lp-oVM-view-Ze5-6b-2t3.nib
28│   │   │   ├── Info.plist
29│   │   │   └── UIViewController-01J-lp-oVM.nib
30│   │   └── Main.storyboardc
31│   │       ├── BYZ-38-t0r-view-8bC-Xf-vdC.nib
32│   │       ├── Info.plist
33│   │       └── UIViewController-BYZ-38-t0r.nib
34│   ├── Debug.xcconfig
35│   ├── Flutter.xcconfig
36│   ├── Frameworks
37│   │   ├── App.framework
38│   │   │   ├── App
39│   │   │   ├── Info.plist
40│   │   │   └── flutter_assets
41│   │   │       ├── AssetManifest.json
42│   │   │       ├── FontManifest.json
43│   │   │       ├── LICENSE
44│   │   │       ├── fonts
45│   │   │       │   └── MaterialIcons-Regular.ttf
46│   │   │       └── packages
47│   │   │           └── cupertino_icons
48│   │   │               └── assets
49│   │   │                   └── CupertinoIcons.ttf
50│   │   └── Flutter.framework
51│   │       ├── Flutter
52│   │       ├── Info.plist
53│   │       └── icudtl.dat
54│   ├── Info.plist
55│   ├── PkgInfo
56│   ├── Release.xcconfig
57│   └── Runner
58├── Runner.app.dSYM
59│   └── Contents
60│       ├── Info.plist
61│       └── Resources
62│           └── DWARF
63│               └── Runner
64├── libPods-Runner.a
65└── shared_preferences
66    └── libshared_preferences.a
67
6818 directories, 46 files
发现打包出来的是.a 文件, 这里我们需要修改一下 ios 目录下的文件, 以便于打包出来 framework 文件, 因为 framework 是 apple 提供的一种打包方案, 直接将所有需要的资源包括头文件,库文件都聚集到了一起,方便引用, 而.a 文件就不一样了, 还需要包含对应的头文件
修改.ios 下的 podfile
在第一行添加这个
1use_frameworks!
然后先清除一下刚刚打包的内容 $ flutter clean
1flutter build ios --release --no-codesign
  1tree build/ios/Release-iphoneos
  2build/ios/Release-iphoneos
  3├── FlutterPluginRegistrant
  4│   ├── FlutterPluginRegistrant.framework
  5│   │   ├── FlutterPluginRegistrant
  6│   │   ├── Headers
  7│   │   │   ├── FlutterPluginRegistrant-umbrella.h
  8│   │   │   └── GeneratedPluginRegistrant.h
  9│   │   ├── Info.plist
 10│   │   └── Modules
 11│   │       └── module.modulemap
 12│   └── FlutterPluginRegistrant.framework.dSYM
 13│       └── Contents
 14│           ├── Info.plist
 15│           └── Resources
 16│               └── DWARF
 17│                   └── FlutterPluginRegistrant
 18├── Pods_Runner.framework
 19│   ├── Headers
 20│   │   └── Pods-Runner-umbrella.h
 21│   ├── Info.plist
 22│   ├── Modules
 23│   │   └── module.modulemap
 24│   └── Pods_Runner
 25├── Runner.app
 26│   ├── AppIcon20x20@2x.png
 27│   ├── AppIcon20x20@2x~ipad.png
 28│   ├── AppIcon20x20@3x.png
 29│   ├── AppIcon20x20~ipad.png
 30│   ├── AppIcon29x29.png
 31│   ├── AppIcon29x29@2x.png
 32│   ├── AppIcon29x29@2x~ipad.png
 33│   ├── AppIcon29x29@3x.png
 34│   ├── AppIcon29x29~ipad.png
 35│   ├── AppIcon40x40@2x.png
 36│   ├── AppIcon40x40@2x~ipad.png
 37│   ├── AppIcon40x40@3x.png
 38│   ├── AppIcon40x40~ipad.png
 39│   ├── AppIcon60x60@2x.png
 40│   ├── AppIcon60x60@3x.png
 41│   ├── AppIcon76x76@2x~ipad.png
 42│   ├── AppIcon76x76~ipad.png
 43│   ├── AppIcon83.5x83.5@2x~ipad.png
 44│   ├── Assets.car
 45│   ├── Base.lproj
 46│   │   ├── LaunchScreen.storyboardc
 47│   │   │   ├── 01J-lp-oVM-view-Ze5-6b-2t3.nib
 48│   │   │   ├── Info.plist
 49│   │   │   └── UIViewController-01J-lp-oVM.nib
 50│   │   └── Main.storyboardc
 51│   │       ├── BYZ-38-t0r-view-8bC-Xf-vdC.nib
 52│   │       ├── Info.plist
 53│   │       └── UIViewController-BYZ-38-t0r.nib
 54│   ├── Debug.xcconfig
 55│   ├── Flutter.xcconfig
 56│   ├── Frameworks
 57│   │   ├── App.framework
 58│   │   │   ├── App
 59│   │   │   ├── Info.plist
 60│   │   │   └── flutter_assets
 61│   │   │       ├── AssetManifest.json
 62│   │   │       ├── FontManifest.json
 63│   │   │       ├── LICENSE
 64│   │   │       ├── fonts
 65│   │   │       │   └── MaterialIcons-Regular.ttf
 66│   │   │       └── packages
 67│   │   │           └── cupertino_icons
 68│   │   │               └── assets
 69│   │   │                   └── CupertinoIcons.ttf
 70│   │   ├── Flutter.framework
 71│   │   │   ├── Flutter
 72│   │   │   ├── Info.plist
 73│   │   │   └── icudtl.dat
 74│   │   ├── FlutterPluginRegistrant.framework
 75│   │   │   ├── FlutterPluginRegistrant
 76│   │   │   └── Info.plist
 77│   │   └── shared_preferences.framework
 78│   │       ├── Info.plist
 79│   │       └── shared_preferences
 80│   ├── Info.plist
 81│   ├── PkgInfo
 82│   ├── Release.xcconfig
 83│   └── Runner
 84├── Runner.app.dSYM
 85│   └── Contents
 86│       ├── Info.plist
 87│       └── Resources
 88│           └── DWARF
 89│               └── Runner
 90└── shared_preferences
 91    ├── shared_preferences.framework
 92    │   ├── Headers
 93    │   │   ├── SharedPreferencesPlugin.h
 94    │   │   └── shared_preferences-umbrella.h
 95    │   ├── Info.plist
 96    │   ├── Modules
 97    │   │   └── module.modulemap
 98    │   └── shared_preferences
 99    └── shared_preferences.framework.dSYM
100        └── Contents
101            ├── Info.plist
102            └── Resources
103                └── DWARF
104                    └── shared_preferences
105
10637 directories, 65 files
Runner.app 这个熟悉的名字下虽然看似包含所有的 framework,但是仔细观察, 这些 framework 内不包含头文件, 所以其实是用不了的
可以使用的是如图所示的几个
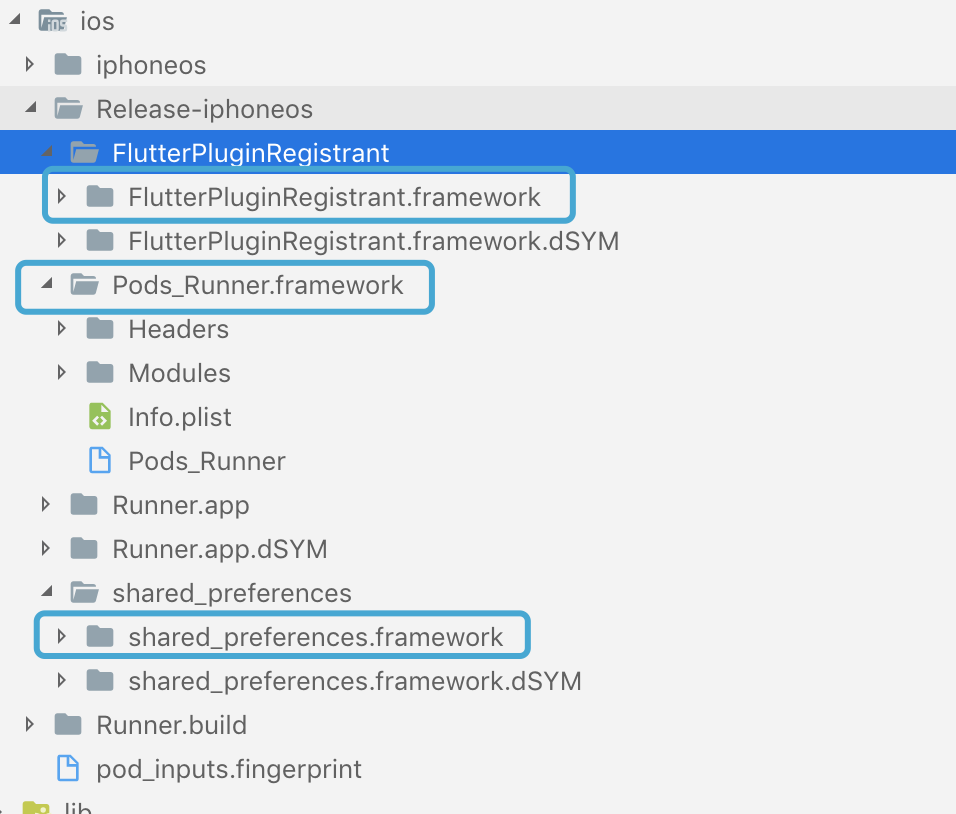
根据上面的 tree 图可以看到,其中包含了全部的库文件, 但除此以外,还需要两个库:
- App.framework: 这个包含了 flutter 的资源
- Flutter.framework: 这个是 Flutter 的 engine 运行库, 每个 flutter 应用必然有的东西
这两个东西需要从.ios 中找到
- App.framework: .ios/Flutter/App.framework
- Flutter.framework: .ios/Flutter/engine/Flutter.framework
这样就集齐了所有的库文件, 问题是, 这样是手动做的, 我们需要一个自动化的方案把重复的工作都完成
所以我根据开头的文章内的脚本编写了一个脚本:
 1if [ -z $out ]; then
 2    out='ios_frameworks'
 3fi
 4
 5echo "准备输出所有文件到目录: $out"
 6
 7find . -d -name build | xargs rm -rf
 8flutter clean
 9rm -rf $out
10rm -rf build
11
12flutter packages get
13flutter build ios --release --no-codesign
14
15mkdir $out
16
17cp -r build/ios/Release-iphoneos/*/*.framework $out
18cp -r .ios/Flutter/App.framework $out
19cp -r .ios/Flutter/engine/Flutter.framework $out
接着可以通过sh build_ios.sh 来自动打包,并且将所有文件复制到 ios_frameword 目录下, 嗯 这个目录可以通过
out=ios_out sh build_ios.sh来改变
关联库文件和工程
原生工程的管理方式有很多种, 比如只使用 xcode 来管理
cocoapod(支持 oc 和 swift)
单独针对 swift 还有 Carthage, Swift Package Manager
当然这里我还是用 cocoapod 的方案, 其他的方案请自行研究
使用 cocoapod 管理原生工程
为原生工程添加一个 Podfile
1cd top.kikt.existsapp
2touch Podfile
3code Podfile # 这一步是用 vscode 打开 你也可以用 vim 或其他任何文本编辑器
修改 Podfile
1platform :ios, '8.0'
2use_frameworks!
3
4target 'top.kikt.existsapp' do
5
6end
然后继续在命令行里 $ pod install
如果没有报错, 则说明原生项目现在已经被 pod 管理了
将 framework 作为一个 pod 库
因为找遍了 podfile 的相关文档, 没有找到可以直接引用 framework 的方式
所以需要一个 pod 库作为"中转"
新建一个库 $ pod lib create flutter-lib, 然后按顺序回答问题, 这目录根据你自己的实际情况来
我的是和 iOS 原生同级目录
 1$ pod lib create flutter-lib
 2Cloning `https://github.com/CocoaPods/pod-template.git` into `flutter-lib`.
 3Configuring flutter-lib template.
 4
 5------------------------------
 6
 7To get you started we need to ask a few questions, this should only take a minute.
 8
 9If this is your first time we recommend running through with the guide:
10 - https://guides.cocoapods.org/making/using-pod-lib-create.html
11 ( hold cmd and double click links to open in a browser. )
12
13
14What platform do you want to use?? [ iOS / macOS ]
15 >
16ios
17What language do you want to use?? [ Swift / ObjC ]
18 > objc
19
20Would you like to include a demo application with your library? [ Yes / No ]
21 > no
22
23Which testing frameworks will you use? [ Specta / Kiwi / None ]
24 > none
25
26Would you like to do view based testing? [ Yes / No ]
27 > no
28
29What is your class prefix?
30 >
31
32You need to provide an answer.
33What is your class prefix?
34 > FFF
35
36Running pod install on your new library.
37
38Analyzing dependencies
39Fetching podspec for `flutter-lib` from `../`
40Downloading dependencies
41Installing flutter-lib (0.1.0)
42Generating Pods project
43Integrating client project
44
45[!] Please close any current Xcode sessions and use `flutter-lib.xcworkspace` for this project from now on.
46Sending stats
47Pod installation complete! There is 1 dependency from the Podfile and 1 total pod installed.
48
49[!] Automatically assigning platform `ios` with version `9.3` on target `flutter-lib_Tests` because no platform was specified. Please specify a platform for this target in your Podfile. See `https://guides.cocoapods.org/syntax/podfile.html#platform`.
50
51 Ace! you're ready to go!
52 We will start you off by opening your project in Xcode
53  open 'flutter-lib/Example/flutter-lib.xcworkspace'
54
55To learn more about the template see `https://github.com/CocoaPods/pod-template.git`.
56To learn more about creating a new pod, see `https://guides.cocoapods.org/making/making-a-cocoapod`.
创建完成后, 修改 flutter-lib.podspec 文件
这里需要先把刚刚的 framework 复制到项目中
默认有一堆注释都可以删掉
然后添加这么一行
1s.ios.vendored_frameworks = 'ios_frameworks/App.framework', 'ios_frameworks/Flutter.framework', 'ios_frameworks/FlutterPluginRegistrant.framework', 'ios_frameworks/shared_preferences.framework'
这个方案是临时的, 后面肯定会写成动态查找的方案, 不可能有一个库写一次
现在我的 podspec 文件是这样的
 1Pod::Spec.new do |s|
 2  s.name             = 'flutter-lib'
 3  s.version          = '0.1.0'
 4  s.summary          = 'A short description of flutter-lib.'
 5  s.description      = <<-DESC
 6TODO: Add long description of the pod here.
 7                       DESC
 8
 9  s.homepage         = 'https://github.com/cjl_spy@163.com/flutter-lib'
10  s.license          = { :type => 'MIT', :file => 'LICENSE' }
11  s.author           = { 'cjl_spy@163.com' => 'cjl_spy@163.com' }
12  s.source           = { :git => 'https://github.com/cjl_spy@163.com/flutter-lib.git', :tag => s.version.to_s }
13  s.ios.deployment_target = '8.0'
14  s.static_framework = true
15  # s.source_files = 'flutter-lib/Classes/**/*'
16  s.ios.vendored_frameworks = 'ios_frameworks/App.framework', 'ios_frameworks/Flutter.framework', 'ios_frameworks/FlutterPluginRegistrant.framework', 'ios_frameworks/shared_preferences.framework'
17end
在原生项目中引用这个库
1platform :ios, '8.0'
2use_frameworks!
3
4target 'top.kikt.existsapp' do
5   pod 'flutter-lib', :path => '../flutter-lib'
6end
接着在原生项目中$ pod install
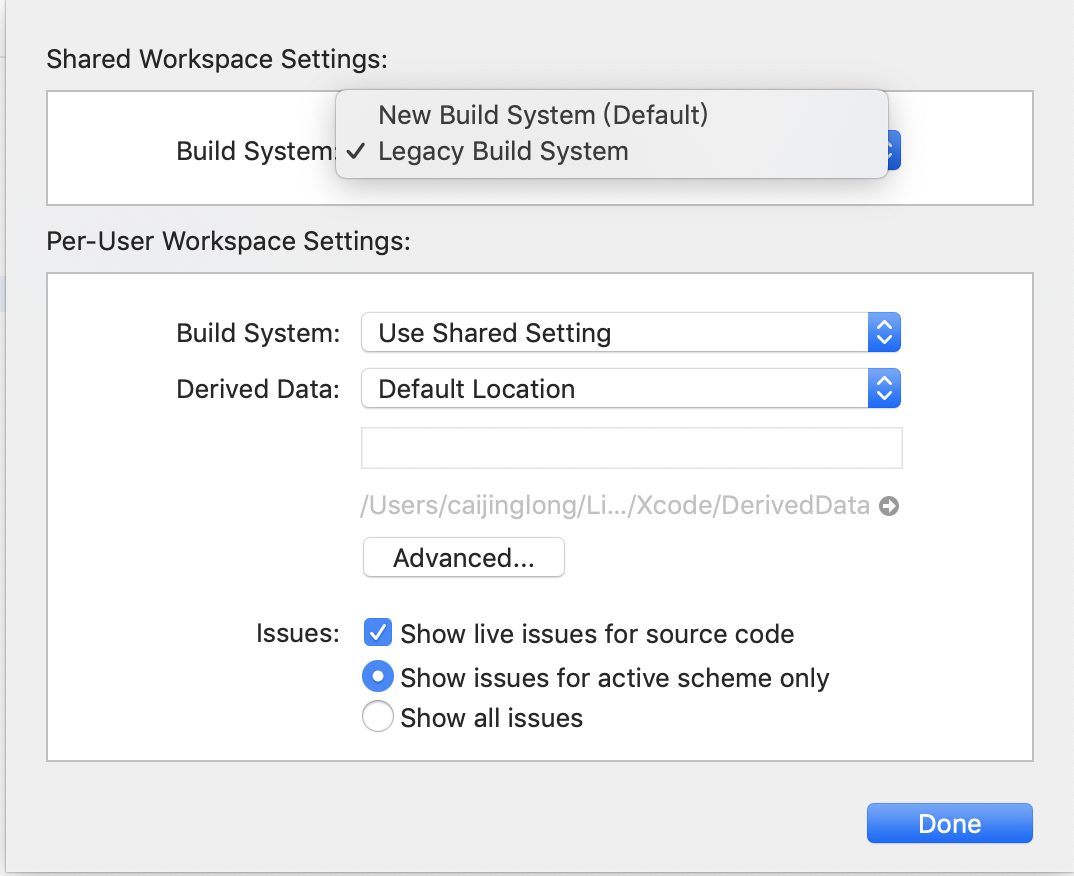
运行项目可能会有两种错误:
信息包含什么 System 之类的, 这个是需要修改构建系统
运行项目还可能会报一个 bitcode 的错误, 这里需要修改一个选项

我的项目目前为止能跑起来不报错了, 但是目前项目还没有启动 Flutter 的页面, 到这一步后我是按照 进行修改的
我给的例子仅有 oc 的,swift 的请自行参考 wiki
修改AppDelegate.h
1#import <UIKit/UIKit.h>
2#import <Flutter/Flutter.h>
3
4@interface AppDelegate : FlutterAppDelegate
5@property (nonatomic,strong) FlutterEngine *flutterEngine;
6@end
AppDelegate.m
 1#import <FlutterPluginRegistrant/GeneratedPluginRegistrant.h> // Only if you have Flutter Plugins
 2
 3#include "AppDelegate.h"
 4
 5@implementation AppDelegate
 6
 7// This override can be omitted if you do not have any Flutter Plugins.
 8- (BOOL)application:(UIApplication *)application
 9    didFinishLaunchingWithOptions:(NSDictionary *)launchOptions {
10  self.flutterEngine = [[FlutterEngine alloc] initWithName:@"io.flutter" project:nil];
11  [self.flutterEngine runWithEntrypoint:nil];
12  [GeneratedPluginRegistrant registerWithRegistry:self.flutterEngine];
13  return [super application:application didFinishLaunchingWithOptions:launchOptions];
14}
15
16@end
接着就是启动 Flutter 的事情了, 这个根据你业务逻辑自行实现, 核心代码是如下几行
 1#import <Flutter/Flutter.h>
 2#import "AppDelegate.h"
 3#import "ViewController.h"
 4
 5@implementation ViewController
 6- (void)viewDidLoad {
 7    [super viewDidLoad];
 8    UIButton *button = [UIButton buttonWithType:UIButtonTypeCustom];
 9    [button addTarget:self
10               action:@selector(handleButtonAction)
11     forControlEvents:UIControlEventTouchUpInside];
12    [button setTitle:@"Press me" forState:UIControlStateNormal];
13    [button setBackgroundColor:[UIColor blueColor]];
14    button.frame = CGRectMake(80.0, 210.0, 160.0, 40.0);
15    [self.view addSubview:button];
16}
17
18- (void)handleButtonAction {
19    FlutterEngine *flutterEngine = [(AppDelegate *)[[UIApplication sharedApplication] delegate] flutterEngine];
20    FlutterViewController *flutterViewController = [[FlutterViewController alloc] initWithEngine:flutterEngine nibName:nil bundle:nil];
21    [self presentViewController:flutterViewController animated:false completion:nil];
22}
23@end
优化脚本
优化 podspec 文件
这一步的目的是, 遍历文件夹, 不再单独的每个引用 framework 文件
podspec 使用的是 ruby 语法, 也就是说本身就支持编程, 这时候如果再用 shell 或者 dart 就有点增加复杂度了
如果不了解 ruby 语法, 你也可以用自己的方法解决(shell,python,dart 什么都随你), 我也是边写边看的 ruby 语法, 按照如下方式修改
 1Pod::Spec.new do |s|
 2  s.name             = 'flutter-lib'
 3  s.version          = '0.1.0'
 4  s.summary          = 'A short description of flutter-lib.'
 5  s.description      = <<-DESC
 6TODO: Add long description of the pod here.
 7                       DESC
 8
 9  s.homepage         = 'https://github.com/cjl_spy@163.com/flutter-lib'
10  s.license          = { :type => 'MIT', :file => 'LICENSE' }
11  s.author           = { 'cjl_spy@163.com' => 'cjl_spy@163.com' }
12  s.source           = { :git => 'https://github.com/cjl_spy@163.com/flutter-lib.git', :tag => s.version.to_s }
13  s.ios.deployment_target = '8.0'
14  s.static_framework = true
15  # s.source_files = 'flutter-lib/Classes/**/*'
16  p = Dir::open("ios_frameworks")
17  arr = Array.new
18  p.each do |f|
19    if f == '.' || f == '..'
20    else
21        arr.push('ios_frameworks/'+f)
22    end
23  end
24
25  s.ios.vendored_frameworks = arr
26end
然后执行 pod install
优化 shell 脚本
 1if [ -z $out ]; then
 2    out='ios_frameworks'
 3fi
 4
 5echo "准备输出所有文件到目录: $out"
 6
 7find . -d -name build | xargs rm -rf
 8flutter clean
 9rm -rf $out
10rm -rf build
11
12flutter packages get
13flutter build ios --release --no-codesign
14
15mkdir $out
16
17cp -r build/ios/Release-iphoneos/*/*.framework $out
18cp -r .ios/Flutter/App.framework $out
19cp -r .ios/Flutter/engine/Flutter.framework $out
20
21cp -r $out ../flutter-lib/ios_frameworks # 添加这步
验证下别的插件
添加插件到 pubspec.yaml
1dependencies:
2  path_provider: ^1.1.0
$ flutter pub get
这里有个小坑,当添加了 pubspec 插件后, flutter/.ios/Podfile 的内容会被恢复成默认状态
所以需要再修改一下 shell 脚本:
 1if [ -z $out ]; then
 2    out='ios_frameworks'
 3fi
 4
 5echo "准备输出所有文件到目录: $out"
 6
 7echo "清除所有已编译文件"
 8find . -d -name build | xargs rm -rf
 9flutter clean
10rm -rf $out
11rm -rf build
12
13flutter packages get
14
15addFlag(){
16    cat .ios/Podfile > tmp1.txt
17    echo "use_frameworks!" >> tmp2.txt
18    cat tmp1.txt >> tmp2.txt
19    cat tmp2.txt > .ios/Podfile
20    rm tmp1.txt tmp2.txt
21}
22
23echo "检查 .ios/Podfile文件状态"
24a=$(cat .ios/Podfile)
25if [[ $a == use* ]]; then
26    echo '已经添加use_frameworks, 不再添加'
27else
28    echo '未添加use_frameworks,准备添加'
29    addFlag
30    echo "添加use_frameworks 完成"
31fi
32
33echo "编译flutter"
34flutter build ios --release --no-codesign
35
36echo "编译flutter完成"
37mkdir $out
38
39cp -r build/ios/Release-iphoneos/*/*.framework $out
40cp -r .ios/Flutter/App.framework $out
41cp -r .ios/Flutter/engine/Flutter.framework $out
42
43echo "复制framework库到临时文件夹: $out"
44
45libpath='../flutter-lib'
46
47rm -rf "$libpath/ios_frameworks"
48mkdir $libpath
49cp -r $out $libpath
50
51echo "复制库文件到: $libpath"
顺便润色了一下,加了一点日志
运行下项目, 跑了一下, 果然没有问题了
这里有一个插曲请注意,我脚本里用了 gsed 命令,这个工具是 GNU-sed 的缩写, 因为 mac 的 sed 命令有一些问题比较难用
请使用$ brew install gnu-sed安装一下, 否则这个命令可能失败
备注: 因为有反馈, gsed 在不同的 mac 上会出现把文本变成一行的问题, 现在采用另一种方案,不再需要 gsed
总结
建议: 请将 flutter,原生和 flutter 的 framework 所在的 pod 库作为 3 个单独的库,便于管理(有 pod 的私服请按照自己的方案实现 framework 的共享)
然后脚本中的目录什么的需要根据你的实际情况进行调整
打包的使用总结
flutter 方:
- 创建一个 pod 库
- 使用脚本打包并把所有的文件复制到 pod 库内
- git commit + push
ios 方:
- git pull
- pod install
- run
后记
到目前为止, iOS 也算是完成了加入到已有工程, 原生方只使用 pod+git 理论上就达到了可以不用 flutter 依然可运行的目的
仓库看这里:
以上