android 引入ffmpeg
文章目录
上篇介绍了如何 在 mac 系统下打包 ffmpeg 的 so
这篇介绍如何引入 so 到项目中
开发环境:
1macos
2android studio 3.2.1
3ndk: 15.2.4203891
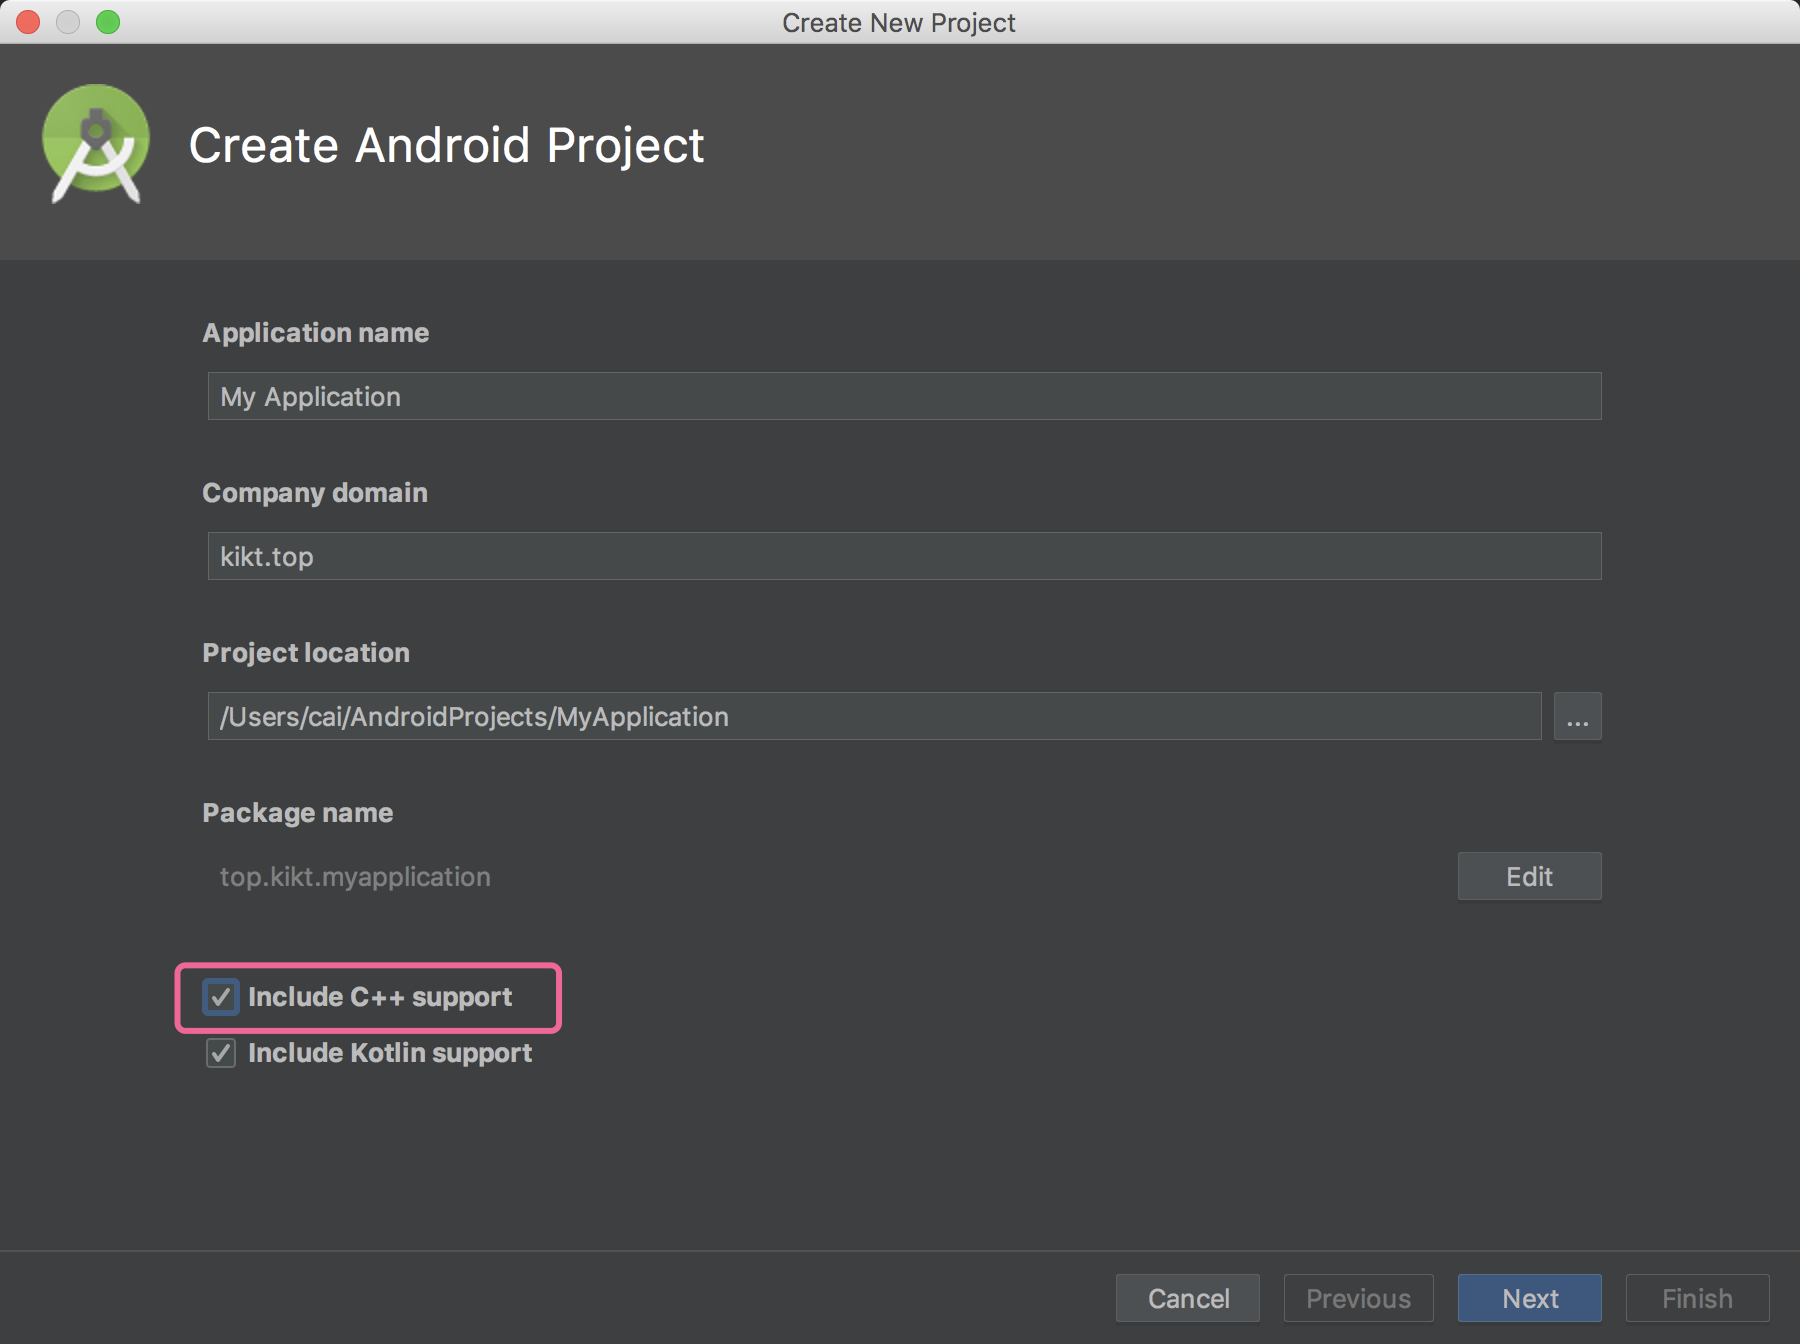
新建一个工程
新建工程时,勾选 c++支持
将文件复制到项目内
需要复制的文件
.h 头文件
so文件
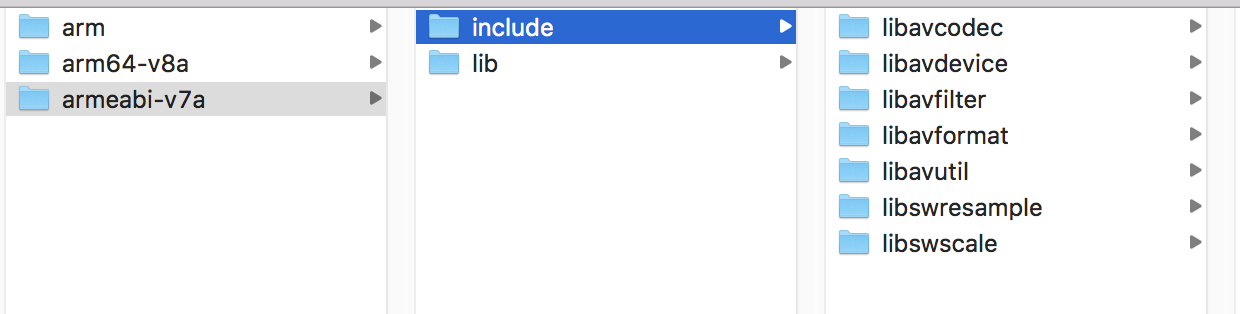
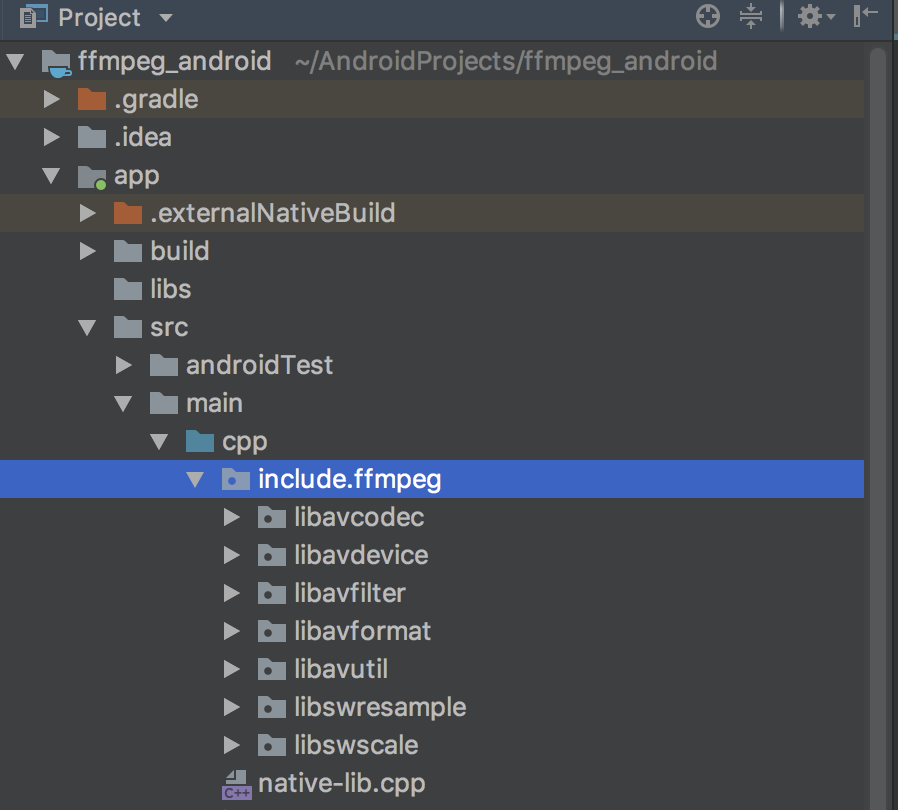
在 cpp 中新建一个文件夹include/ffmpeg 把 include 中的文件夹复制到 ffmpeg 下
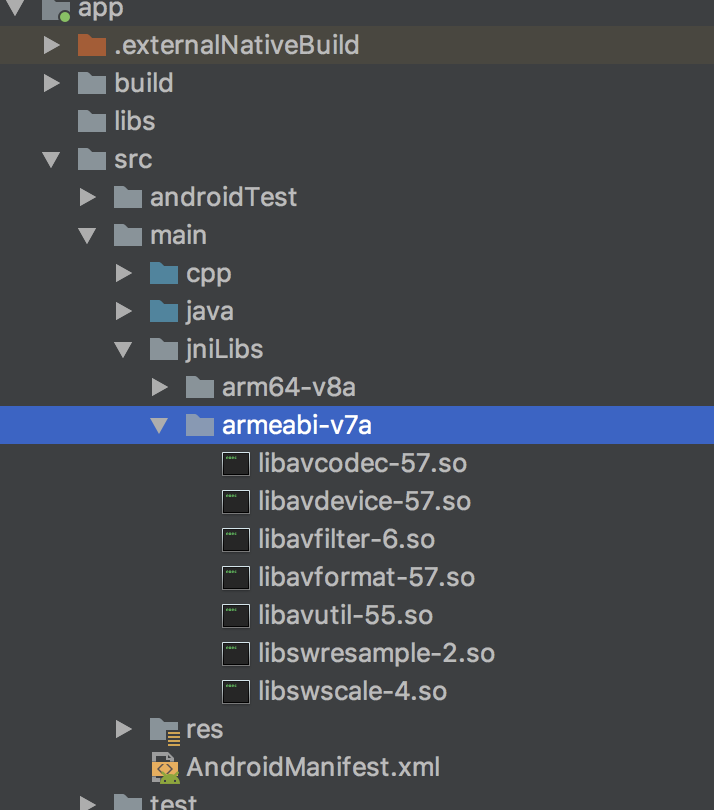
在 main 下新建文件夹jniLibs,把 so 文件复制到其中
修改 CMakeList
完整的CMakeList.txt 如下
  1# For more information about using CMake with Android Studio, read the
  2# documentation: https://d.android.com/studio/projects/add-native-code.html
  3
  4# Sets the minimum version of CMake required to build the native library.
  5
  6cmake_minimum_required(VERSION 3.4.1)
  7
  8# Creates and names a library, sets it as either STATIC
  9# or SHARED, and provides the relative paths to its source code.
 10# You can define multiple libraries, and CMake builds them for you.
 11# Gradle automatically packages shared libraries with your APK.
 12
 13#
 14#
 15set(distribution_DIR ${CMAKE_SOURCE_DIR}/src/main/jniLibs)
 16
 17#
 18
 19
 20#set(FFDIR /Users/cai/code/c/ffmpeg-3.3.6/android/arm/lib)
 21
 22include_directories(
 23        src/main/cpp/include/ffmpeg
 24)
 25
 26# ffmpeg 的library
 27add_library(
 28        avcodec
 29        SHARED
 30        IMPORTED
 31)
 32set_target_properties(
 33        avcodec
 34        PROPERTIES IMPORTED_LOCATION
 35        ${CMAKE_SOURCE_DIR}/src/main/jniLibs/${ANDROID_ABI}/libavcodec-57.so
 36)
 37
 38add_library(
 39        avdevice
 40        SHARED
 41        IMPORTED
 42)
 43set_target_properties(
 44        avdevice
 45        PROPERTIES IMPORTED_LOCATION
 46        ${CMAKE_SOURCE_DIR}/src/main/jniLibs/${ANDROID_ABI}/libavdevice-57.so
 47)
 48
 49add_library(
 50        avfilter
 51        SHARED
 52        IMPORTED
 53)
 54set_target_properties(
 55        avfilter
 56        PROPERTIES IMPORTED_LOCATION
 57        ${CMAKE_SOURCE_DIR}/src/main/jniLibs/${ANDROID_ABI}/libavfilter-6.so
 58)
 59
 60add_library(
 61        avformat
 62        SHARED
 63        IMPORTED
 64)
 65set_target_properties(
 66        avformat
 67        PROPERTIES IMPORTED_LOCATION
 68        ${CMAKE_SOURCE_DIR}/src/main/jniLibs/${ANDROID_ABI}/libavformat-57.so
 69)
 70
 71add_library(
 72        avutil
 73        SHARED
 74        IMPORTED
 75)
 76set_target_properties(
 77        avutil
 78        PROPERTIES IMPORTED_LOCATION
 79        ${CMAKE_SOURCE_DIR}/src/main/jniLibs/${ANDROID_ABI}/libavutil-55.so
 80)
 81
 82
 83add_library(
 84        swresample
 85        SHARED
 86        IMPORTED
 87)
 88set_target_properties(
 89        swresample
 90        PROPERTIES IMPORTED_LOCATION
 91        ${CMAKE_SOURCE_DIR}/src/main/jniLibs/${ANDROID_ABI}/libswresample-2.so
 92)
 93
 94add_library(
 95        swscale
 96        SHARED
 97        IMPORTED
 98)
 99set_target_properties(
100        swscale
101        PROPERTIES IMPORTED_LOCATION
102        ${CMAKE_SOURCE_DIR}/src/main/jniLibs/${ANDROID_ABI}/libswscale-4.so
103)
104
105# ffmpeg 的library end
106
107# Searches for a specified prebuilt library and stores the path as a
108# variable. Because CMake includes system libraries in the search path by
109# default, you only need to specify the name of the public NDK library
110# you want to add. CMake verifies that the library exists before
111# completing its build.
112
113find_library( # Sets the name of the path variable.
114        log-lib
115
116        # Specifies the name of the NDK library that
117        # you want CMake to locate.
118        log)
119
120add_library( # Sets the name of the library.
121        native-lib
122
123        # Sets the library as a shared library.
124        SHARED
125
126        # Provides a relative path to your source file(s).
127        src/main/cpp/native-lib.cpp
128        )
129
130# Specifies libraries CMake should link to your target library. You
131# can link multiple libraries, such as libraries you define in this
132# build script, prebuilt third-party libraries, or system libraries.
133
134target_link_libraries( # Specifies the target library.
135        native-lib
136
137        # ffmpeg 相关库
138        avcodec
139        avdevice
140        avfilter
141        avformat
142        avutil
143        swresample
144        swscale
145        #
146
147        # Links the target library to the log library
148        # included in the NDK.
149        ${log-lib})
简单解释下:
1# 设置so文件的目录
2set(distribution_DIR ${CMAKE_SOURCE_DIR}/src/main/jniLibs)
1# 引入头文件
2include_directories(
3        src/main/cpp/include/ffmpeg
4)
 1#视为一组
 2
 3# 第一个为库名称,类型,已导入
 4add_library(
 5        avcodec
 6        SHARED
 7        IMPORTED
 8)
 9
10# 库名称, 属性名称, 文件路径
11set_target_properties(
12        avcodec
13        PROPERTIES IMPORTED_LOCATION
14        ${CMAKE_SOURCE_DIR}/src/main/jniLibs/${ANDROID_ABI}/libavcodec-57.so
15)
 1# 这两个是新建项目时自带的, 这个应该是ndk中的库
 2find_library( # Sets the name of the path variable.
 3        log-lib
 4
 5        # Specifies the name of the NDK library that
 6        # you want CMake to locate.
 7        log)
 8
 9add_library( # Sets the name of the library.
10        native-lib
11
12        # Sets the library as a shared library.
13        SHARED
14
15        # Provides a relative path to your source file(s).
16        src/main/cpp/native-lib.cpp
17        )
 1# 最后是连接到项目中
 2target_link_libraries( # Specifies the target library.
 3        native-lib
 4
 5        # ffmpeg 相关库
 6        avcodec
 7        avdevice
 8        avfilter
 9        avformat
10        avutil
11        swresample
12        swscale
13        #
14
15        # Links the target library to the log library
16        # included in the NDK.
17        ${log-lib})
作用解释没有那么准确,大概理解意思就行
修改 cpp/kotlin 文件
新建项目时会有一个 cpp 文件,
 1#include <jni.h>
 2#include <string>
 3
 4// 这里的导入是我们新建的
 5extern "C" {
 6#include <libavutil/log.h>
 7#include <libavformat/avformat.h>
 8}
 9
10extern "C" JNIEXPORT jstring JNICALL
11Java_top_kikt_ffmpegandroidexample_MainActivity_stringFromJNI(
12        JNIEnv *env,
13        jobject /* this */) {
14    std::string hello = "Hello from C++";
15    return env->NewStringUTF(hello.c_str());
16}
17
18
19// 这里是我们自己新建的方法
20extern "C" JNIEXPORT jint JNICALL
21Java_top_kikt_ffmpegandroidexample_MainActivity_dumpInfo(
22        JNIEnv *env,
23        jobject) {
24
25    av_log_set_level(AV_LOG_DEBUG);
26    av_register_all();
27
28    return 1;
29}
有 2 个方法,第二个是我们自定义的, 导包部分引入了 avutil 和 avformat 的头文件
这里有一点要格外注意 extern "C" 我们必须要用这个,这个是在 cpp 中使用 c 文件的必备方法
不然在运行时会报错,当然如果你本身是 c 文件就不存在这个问题了
然后修改 kotlin 文件
 1package top.kikt.ffmpegandroidexample
 2
 3import android.os.Bundle
 4import android.support.v7.app.AppCompatActivity
 5import kotlinx.android.synthetic.main.activity_main.*
 6
 7class MainActivity : AppCompatActivity() {
 8
 9    override fun onCreate(savedInstanceState: Bundle?) {
10        super.onCreate(savedInstanceState)
11        setContentView(R.layout.activity_main)
12
13        // Example of a call to a native method
14        sample_text.text = stringFromJNI()
15
16        sample_text.text = dumpInfo().toString()
17    }
18
19    /**
20     * A native method that is implemented by the 'native-lib' native library,
21     * which is packaged with this application.
22     */
23    external fun stringFromJNI(): String
24
25    external fun dumpInfo(): Int
26
27    companion object {
28
29        // Used to load the 'native-lib' library on application startup.
30        init {
31            System.loadLibrary("native-lib")
32            System.loadLibrary("avformat")
33            System.loadLibrary("avutil")
34        }
35    }
36}
这里可以看到我们输出的内容来源于自己新建的内容 dumpInfo 会调用到刚刚在 cpp 中定义的第二个方法,并且运行时 loadLibrary 也没有报找不到 so 的异常, 这就说明成功了
后记
本篇在 android 项目中引入了 ffmpeg ,完成了这一步的跨越后,很多 ffmpeg 的功能就可以自己写 jni 方法来调用了!
比如直播,滤镜,yuv 处理等等,依托于 ffmpeg 强大的生态,音视频领域可以说有大半可做了!