Android Q 隐私篇(1) - 外部储存
文章目录
一年一度的 googleIO 开完以后,不出意外的 Android10.0 系统(AndroidQ)出来了
隐私配置又㕛叒叕更新了..
连接地址: 这个地址可能在来年就变成 android 11 的了, 所以仅保证在2019 年 05 月 20 日以及之后的一段时间内有效
主要包含以下五大项目
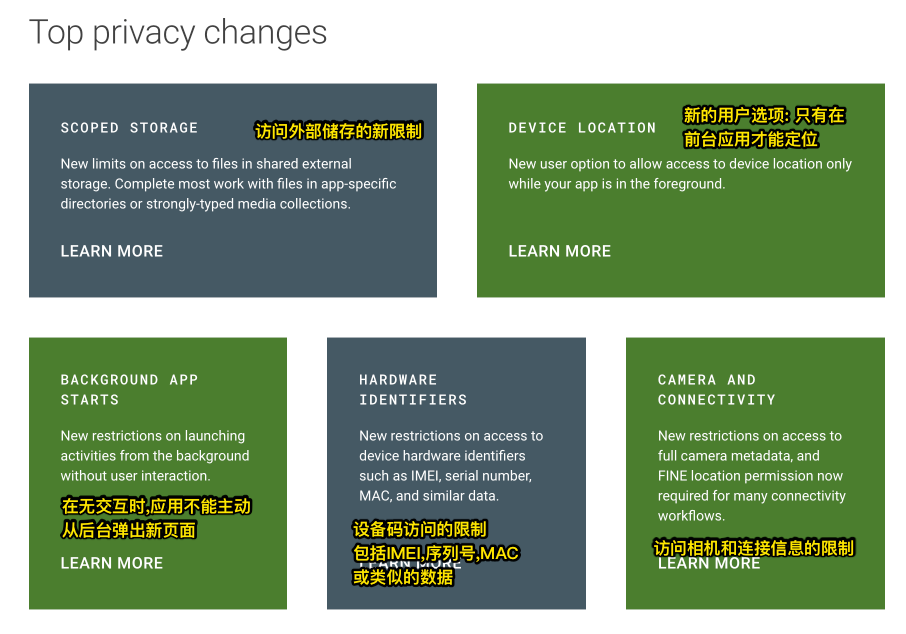
对于大部分应用来说,储存方式的更新会有所影响, 其他的可能都是 SDK 要做的事情,和普通开发者关系不大
在适配新的系统前就和从前一样,暂时不升级 targetVersion,把 targetVersion 设置为 28 以下就不会影响旧程序了,就如同以前运行时权限真的是坑到爆炸,但是暂时不适配也是可以的
但是未来无论如何都需要适配新系统,所以先来看看
本篇只说储存的方式和权限问题,其他暂时略过不表
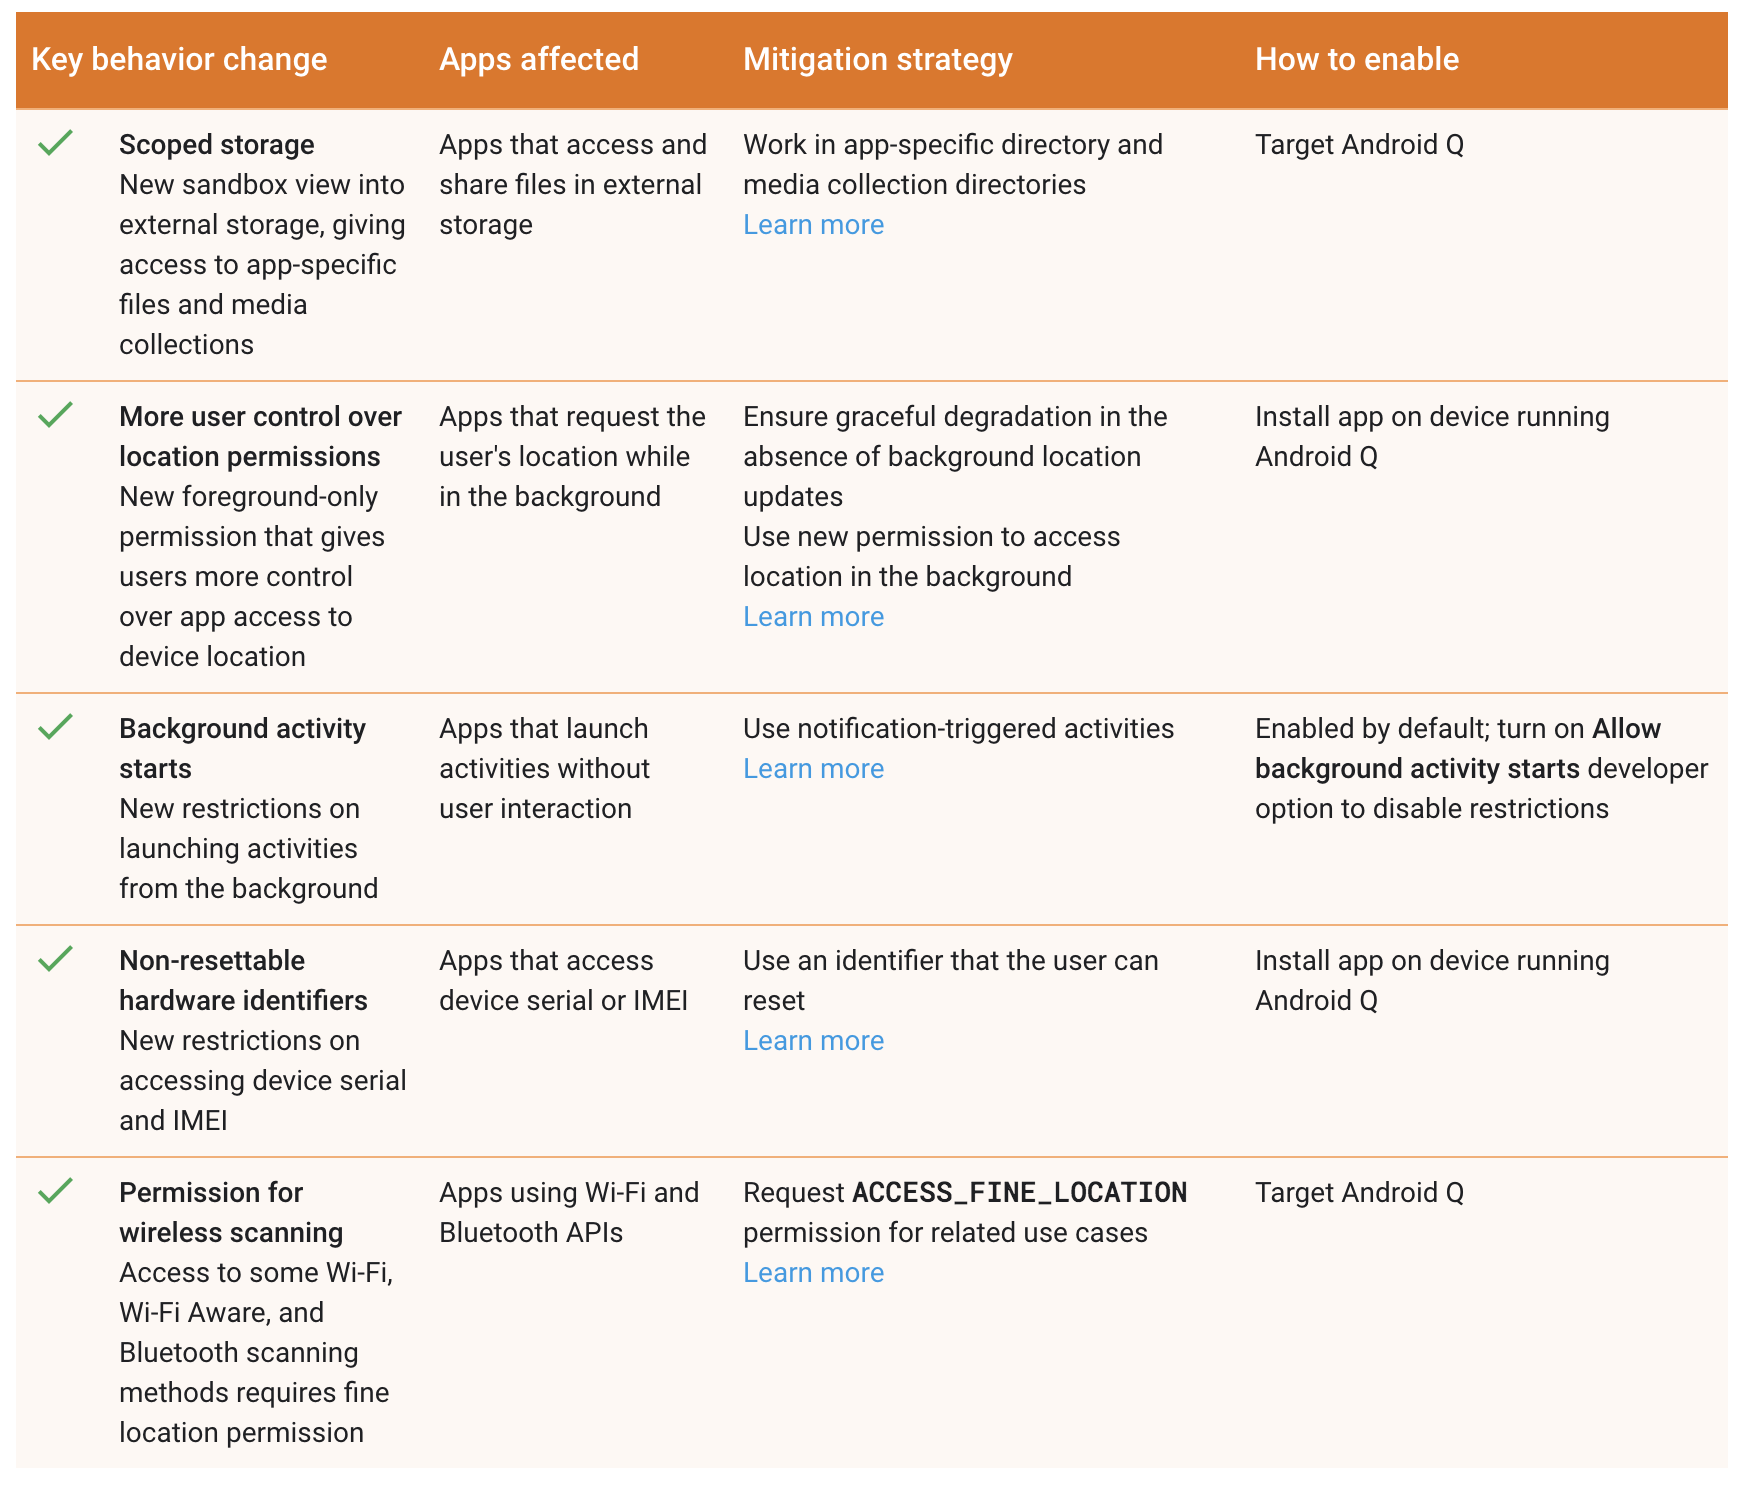
检查迁移情况
有一个表格提供了如何检查和迁移的方案
开发环境
说一下开发环境
MacOS
Android Studio 3.4.0
android 9.0 设备一台
androidQ 虚拟机一台(官方的 Emulator)
更新 sdk
更新 sdk, 下载 androidQ 相关的 sdk/sdktools/模拟器
androidQ build.gradle
当前想尝试 androidQ 的话, 编译版本和目标版本号需要按如下方式设置, 今后的话可能是 29/30 之类的数字
1targetSdkVersion = 'Q'
2compileSdkVersion = 'android-Q'
外部储存
androidQ 下读写文件
权限和以前一样
1    <uses-permission android:name="android.permission.READ_EXTERNAL_STORAGE"/>
2    <uses-permission android:name="android.permission.WRITE_EXTERNAL_STORAGE"/>
Activity 文件
 1package top.kikt.camerax.scopedstorage
 2
 3import android.os.Bundle
 4import android.util.Log
 5import androidx.appcompat.app.AppCompatActivity
 6import java.io.File
 7
 8class MainActivity : AppCompatActivity() {
 9
10    companion object {
11        private const val TAG = "MainActivity"
12    }
13
14    override fun onCreate(savedInstanceState: Bundle?) {
15        super.onCreate(savedInstanceState)
16        setContentView(R.layout.activity_main)
17
18        val path = externalCacheDir?.absoluteFile?.path
19
20        Log.d(TAG, "cache dir = $path")
21
22        val file = File(path, "abc.txt")
23
24        file.writeText("我要往里写数据")
25
26        val text = file.readText()
27
28        Log.d(TAG, "数据是: $text")
29    }
30}
12019-05-20 11:41:28.938 7435-7435/top.kikt.camerax.scopedstorage D/MainActivity: cache dir = /storage/emulated/0/Android/data/top.kikt.camerax.scopedstorage/cache
22019-05-20 11:41:28.957 7435-7435/top.kikt.camerax.scopedstorage D/MainActivity: 数据是: 我要往里写数据
这里可以看出, 在正常情况下, 将文件存入外部储存比从前方便了, 不再需要动态权限申请
并且,我这里的小米手机没有弹出敏感权限的那个对话框
外部储存的"沙箱"
从前只要用户允许 app 访问外置储存后, 就可以通过 MediaStore 的 api 拿到图片和相册的完整数据
而 androidQ 中对于这部分权限进行了重新处理
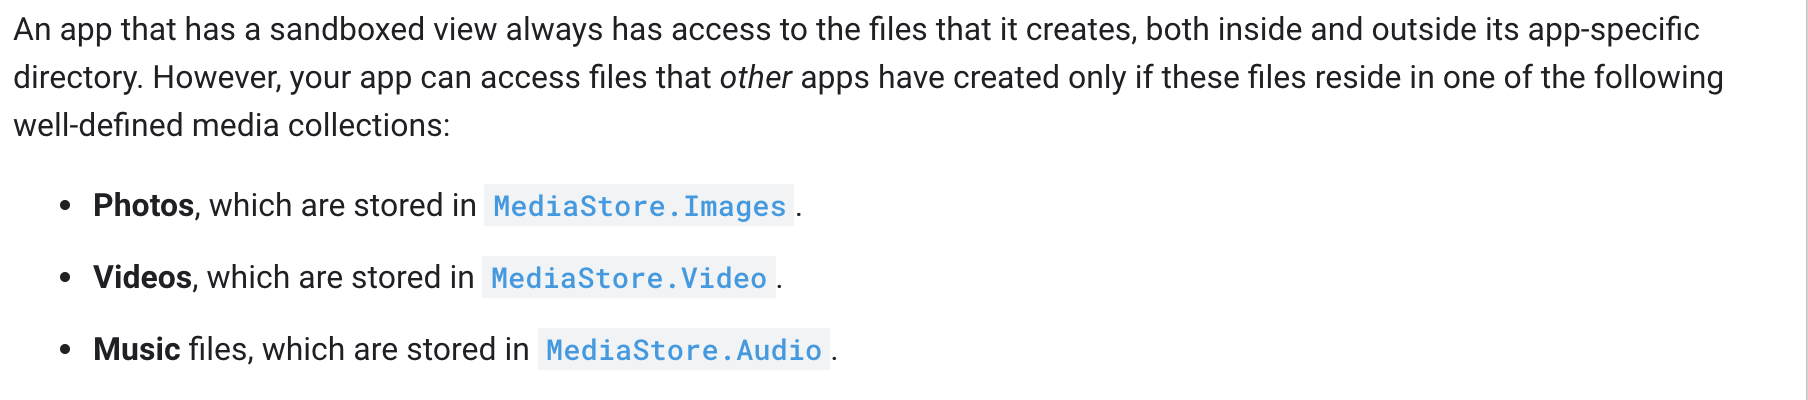
按照文档的说法, 目前外部储存中是沙箱的模式, 除非你的目标文件属于以下三类, 否则其他应用将无法看到你的图片
1Photos, which are stored in MediaStore.Images.
2Videos, which are stored in MediaStore.Video.
3Music files, which are stored in MediaStore.Audio.
想要访问非自己 app 的特定的文件夹, 比如 downloads, 你需要使用, 这是一个 android 4.4 加入的 api, 官方有中文说明, 网上应该也有很多示例代码, 这里不展开了
有一点需要注意: 当 app 被卸载后, 位于外部储存中的 app 数据会被清除, 如果你需要保留数据, 必须保存到 MediaStore 中
因为是按顺序浏览文档说明, 我看到了如下的说明:
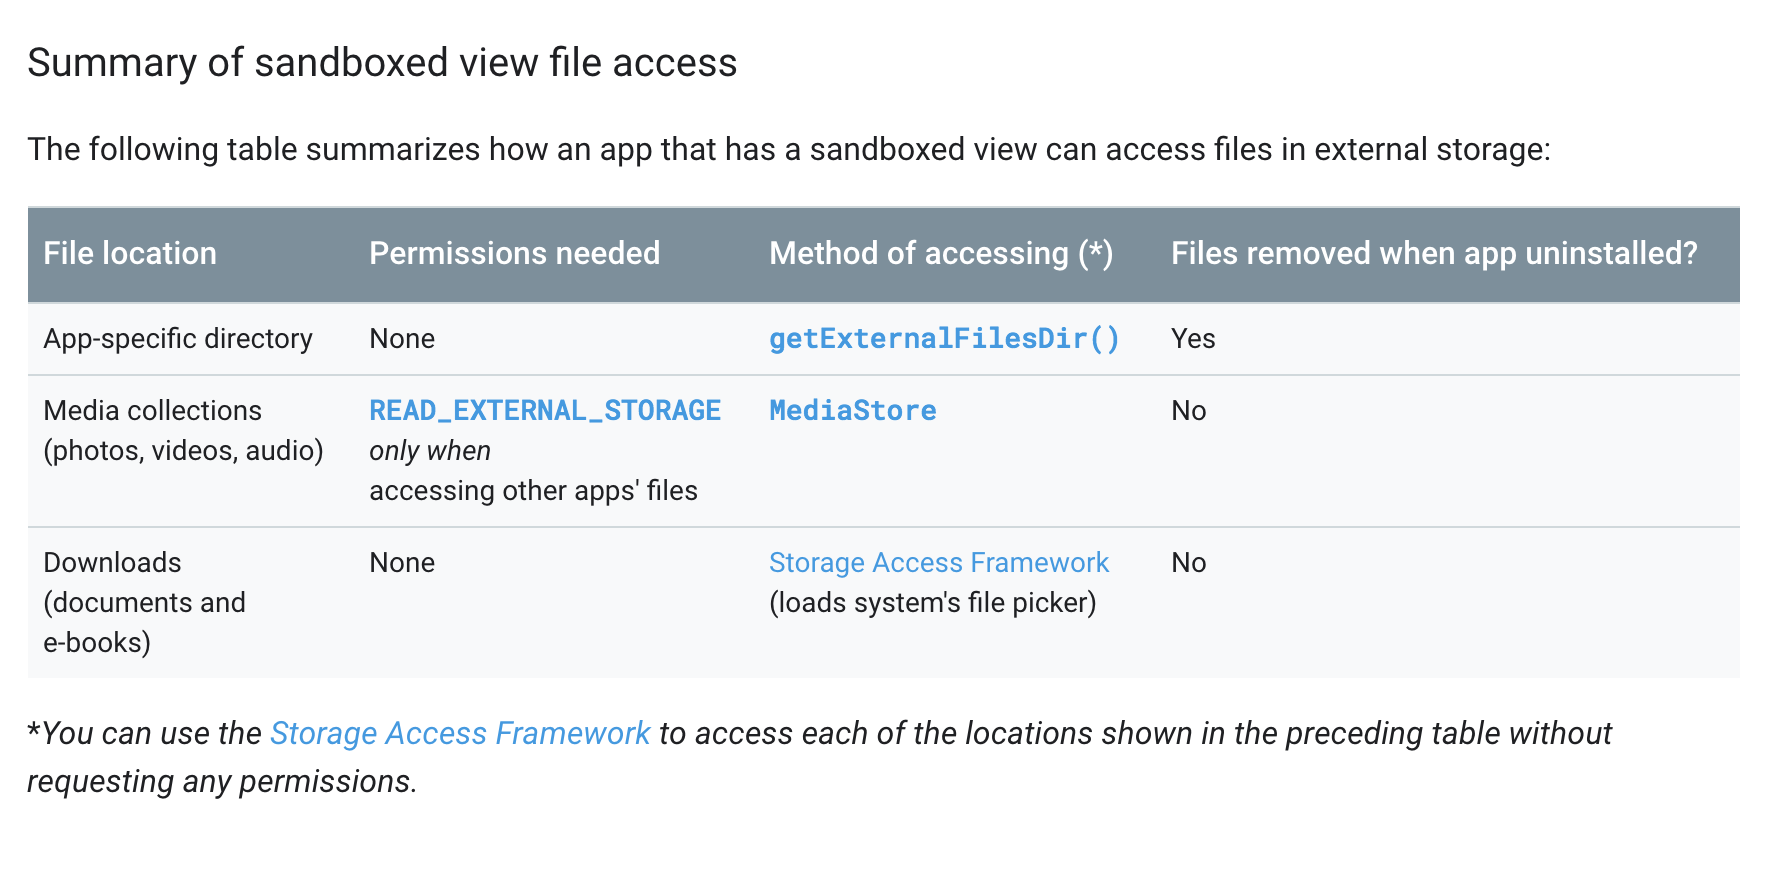
访问自己 app 位于外部储存中的内容不需要访问权限, 所以这里我注释掉清单文件中的权限, 发现表现和之前一样, 可以写入和读取文件, 这也就解释了为什么不会弹出敏感权限申请, 因为在 androidQ 中, 访问自己 app 的文件不再是敏感权限
相册图片
完整的代码如下, 使用了 RxJava+RxPermission 做权限的申请
  1package top.kikt.camerax.scopedstorage
  2
  3import android.Manifest
  4import android.database.Cursor
  5import android.graphics.Bitmap
  6import android.net.Uri
  7import android.os.Build
  8import android.os.Bundle
  9import android.provider.MediaStore
 10import android.util.Log
 11import android.util.Size
 12import androidx.appcompat.app.AppCompatActivity
 13import androidx.core.database.getIntOrNull
 14import com.tbruyelle.rxpermissions2.RxPermissions
 15import kotlinx.android.synthetic.main.activity_media_scan.*
 16
 17class MediaScanActivity : AppCompatActivity() {
 18
 19    private val rxPermissions = RxPermissions(this)
 20
 21    private val TAG = "MediaScanActivity"
 22
 23    private val storeImageKeys = arrayOf(
 24        MediaStore.Images.Media.DISPLAY_NAME, // 显示的名字
 25        MediaStore.Images.Media.DATA, // 数据
 26        MediaStore.Images.Media.LONGITUDE, // 经度
 27        MediaStore.Images.Media._ID, // id
 28        MediaStore.Images.Media.MINI_THUMB_MAGIC, // id
 29        MediaStore.Images.Media.TITLE, // id
 30        MediaStore.Images.Media.BUCKET_ID, // dir id 目录
 31        MediaStore.Images.Media.BUCKET_DISPLAY_NAME, // dir name 目录名字
 32//        MediaStore.Images.Media.EXTERNAL_CONTENT_URI, // dir name 目录名字
 33        MediaStore.Images.Media.WIDTH, // 宽
 34        MediaStore.Images.Media.HEIGHT, // 高
 35        MediaStore.Images.Media.DATE_TAKEN //日期
 36    )
 37
 38    override fun onCreate(savedInstanceState: Bundle?) {
 39        super.onCreate(savedInstanceState)
 40        setContentView(R.layout.activity_media_scan)
 41
 42        bt_scan.setOnClickListener {
 43            Log.d(TAG, "准备申请权限")
 44            rxPermissions.request(
 45                Manifest.permission.WRITE_EXTERNAL_STORAGE,
 46                Manifest.permission.READ_EXTERNAL_STORAGE
 47            )
 48                .subscribe {
 49                    if (it) {
 50                        Log.d(TAG, "申请权限成功")
 51                        scan()
 52                    } else {
 53                        Log.d(TAG, "申请失败")
 54                    }
 55                }
 56        }
 57    }
 58
 59    private fun scan() {
 60        val cursor = contentResolver.query(
 61            MediaStore.Images.Media.EXTERNAL_CONTENT_URI,
 62            storeImageKeys,
 63            null,
 64            null,
 65            MediaStore.Images.Media.DATE_TAKEN
 66        )
 67
 68        cursor?.apply {
 69            val count = this.count
 70            Log.d(TAG, "scan count is $count")
 71            while (this.moveToNext()) {
 72                val date = this.getString(MediaStore.Images.Media.DATA)
 73                Log.d(TAG, "path : $date")
 74//                contentResolver.loadThumbnail()
 75                val width = this.getInteger(MediaStore.Images.Media.WIDTH) ?: 1024
 76                val height = this.getInteger(MediaStore.Images.Media.HEIGHT) ?: 1024
 77                Log.d(TAG, "width : $width")
 78                Log.d(TAG, "height : $height")
 79
 80                var photoUri = Uri.withAppendedPath(
 81                    MediaStore.Images.Media.EXTERNAL_CONTENT_URI,
 82                    cursor.getString(MediaStore.Images.Media._ID)
 83                )
 84
 85                Log.d(TAG, "version int = ${Build.VERSION.SDK_INT}")
 86
 87//                if (Build.VERSION.SDK_INT >= Build.VERSION_CODES.Q) {
 88                    photoUri = MediaStore.setRequireOriginal(photoUri)
 89//                    val stream = contentResolver.openInputStream(photoUri)
 90                    val bitmap = contentResolver.loadThumbnail(photoUri, Size(width, height), null)
 91                    iv_preview.setImageBitmap(bitmap)
 92//                }
 93            }
 94        }
 95
 96        cursor?.close()
 97    }
 98
 99    private fun Cursor.getString(columnName: String): String? {
100        val columnIndex = getColumnIndex(columnName)
101        if (columnIndex == -1) {
102            return null
103        }
104        return this.getString(columnIndex)
105    }
106
107    private fun Cursor.getInteger(columnName: String): Int? {
108        val columnIndex = getColumnIndex(columnName)
109        if (columnIndex == -1) {
110            return null
111        }
112        return this.getIntOrNull(columnIndex)
113    }
114
115    data class ImageEntity(val width: Int, val height: Int, val bitmap: Bitmap) {
116        fun dispose() {
117            bitmap.recycle()
118        }
119    }
120}
布局在这里
 1<?xml version="1.0" encoding="utf-8"?>
 2<androidx.constraintlayout.widget.ConstraintLayout
 3        xmlns:android="http://schemas.android.com/apk/res/android"
 4        xmlns:tools="http://schemas.android.com/tools"
 5        xmlns:app="http://schemas.android.com/apk/res-auto"
 6        android:layout_width="match_parent"
 7        android:layout_height="match_parent"
 8        tools:context=".MediaScanActivity">
 9
10    <Button
11            android:text="扫描"
12            android:layout_width="wrap_content"
13            android:layout_height="wrap_content" tools:layout_editor_absoluteY="16dp"
14            tools:layout_editor_absoluteX="16dp" android:id="@+id/bt_scan"/>
15    <ImageView
16            android:layout_width="0dp"
17            android:layout_height="0dp"
18            android:id="@+id/iv_preview" app:layout_constraintEnd_toEndOf="parent"
19            app:layout_constraintStart_toStartOf="parent" android:layout_marginStart="8dp"
20            app:layout_constraintBottom_toBottomOf="parent" android:layout_marginTop="8dp"
21            app:layout_constraintTop_toBottomOf="@+id/bt_scan" android:layout_marginEnd="8dp"
22            android:layout_marginBottom="8dp"/>
23</androidx.constraintlayout.widget.ConstraintLayout>
点击扫描后能看见这个图片
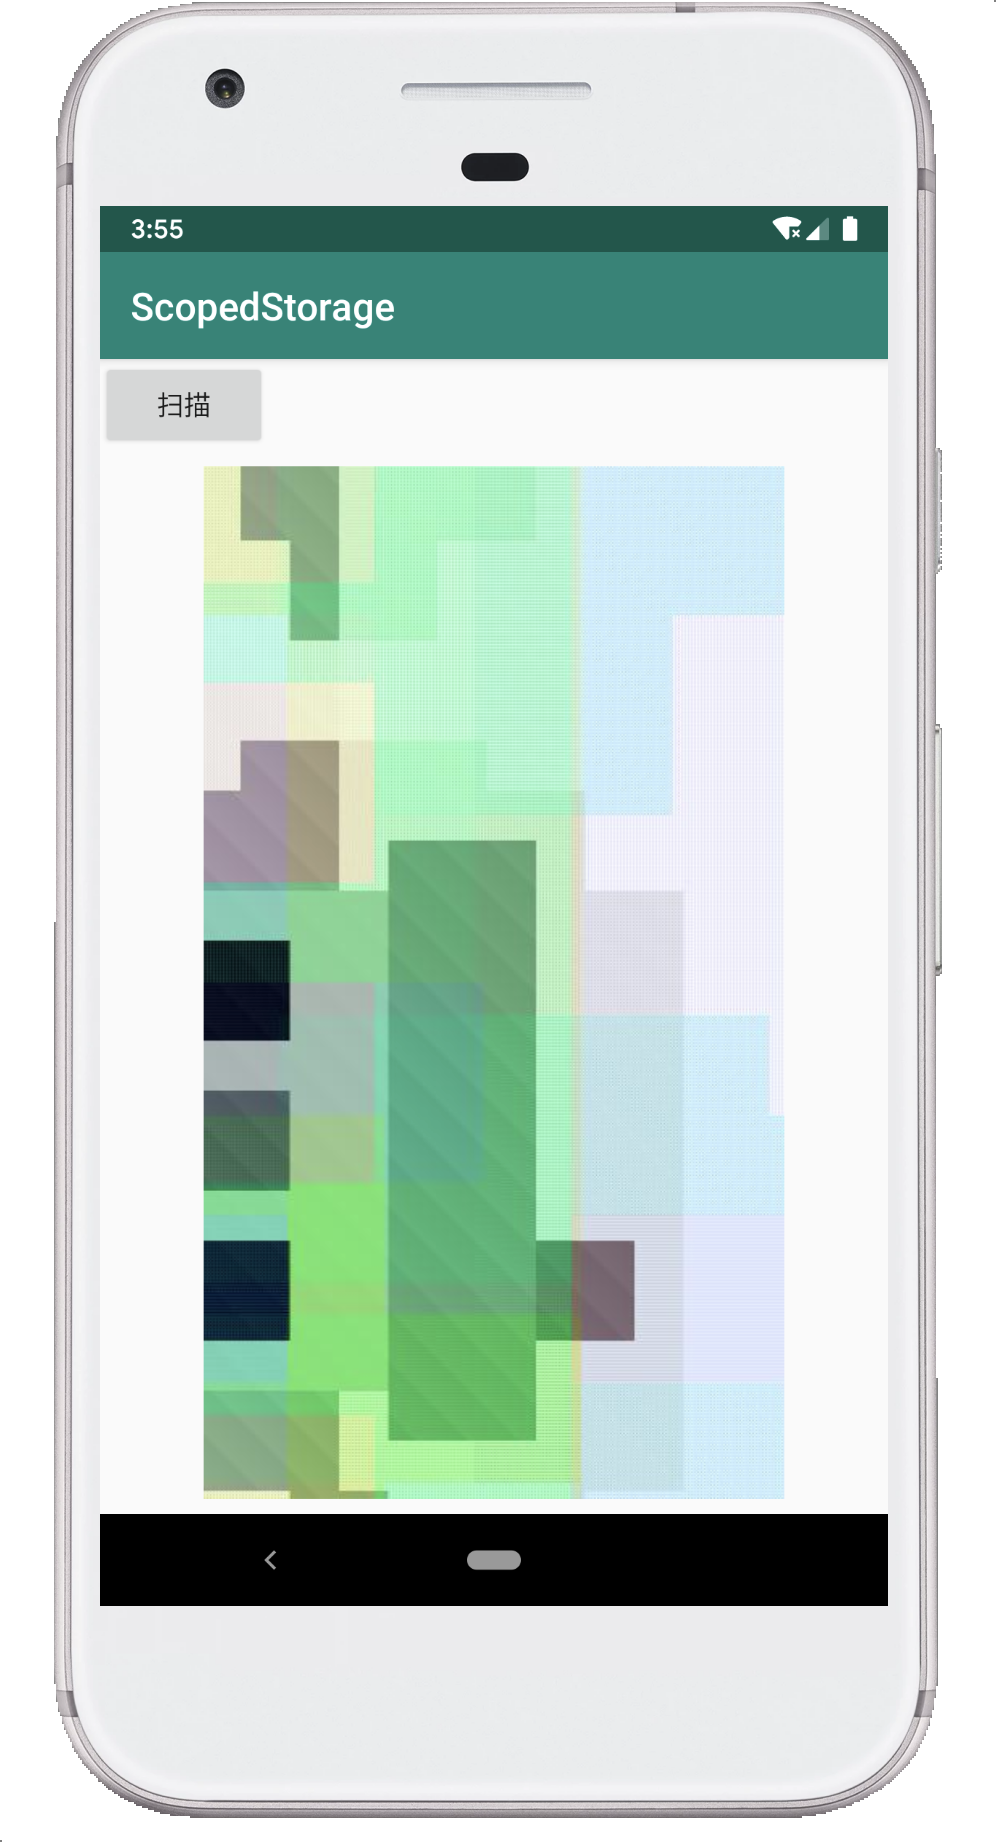
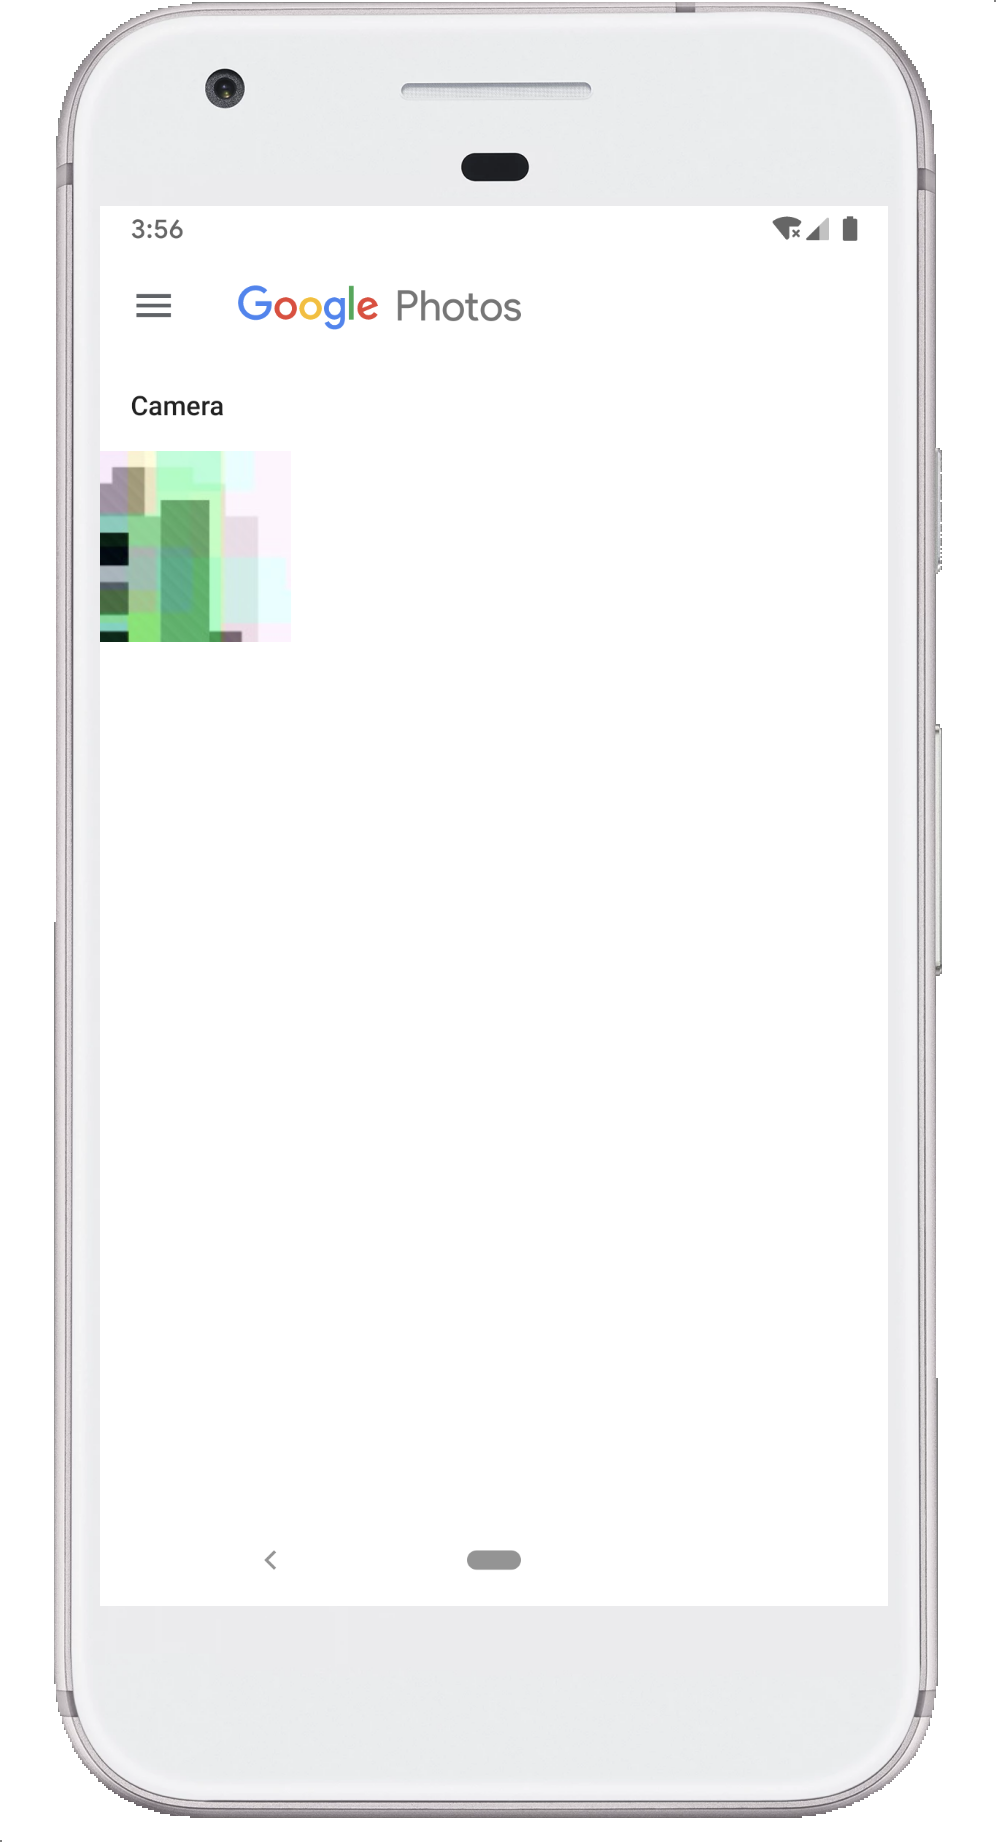
相册里只有这一张图
核心代码如下:
 1    val cursor = contentResolver.query(
 2        MediaStore.Images.Media.EXTERNAL_CONTENT_URI,
 3        storeImageKeys,
 4        null,
 5        null,
 6        MediaStore.Images.Media.DATE_TAKEN
 7    )
 8
 9    cursor?.apply {
10        val count = this.count
11        Log.d(TAG, "scan count is $count")
12        while (this.moveToNext()) {
13            val date = this.getString(MediaStore.Images.Media.DATA)
14            Log.d(TAG, "path : $date")
15//                contentResolver.loadThumbnail()
16            val width = this.getInteger(MediaStore.Images.Media.WIDTH) ?: 1024
17            val height = this.getInteger(MediaStore.Images.Media.HEIGHT) ?: 1024
18            Log.d(TAG, "width : $width")
19            Log.d(TAG, "height : $height")
20
21            var photoUri = Uri.withAppendedPath(
22                MediaStore.Images.Media.EXTERNAL_CONTENT_URI,
23                cursor.getString(MediaStore.Images.Media._ID)
24            )
25
26            Log.d(TAG, "version int = ${Build.VERSION.SDK_INT}")
27
28//                if (Build.VERSION.SDK_INT >= Build.VERSION_CODES.Q) { // 这里注释的原因是因为模拟器中获取的是28, 而SDK中定义是10000, 这样写这个代码跑不起来
29                photoUri = MediaStore.setRequireOriginal(photoUri)
30//                    val stream = contentResolver.openInputStream(photoUri)
31                val bitmap = contentResolver.loadThumbnail(photoUri, Size(width, height), null)
32                iv_preview.setImageBitmap(bitmap)
33//                }
34        }
35    }
36
37    cursor?.close()
以前版本直接用 Data 就可以拿到图片对应的 File path
而 android-Q 以后,不能再这样做了,需要通过 id 来"组装"出一个 Uri, 然后通过 contentResolver.loadThumbnail()来获取缩略图
 1    var photoUri = Uri.withAppendedPath(
 2        MediaStore.Images.Media.EXTERNAL_CONTENT_URI,
 3        cursor.getString(MediaStore.Images.Media._ID)
 4    )
 5
 6    Log.d(TAG, "version int = ${Build.VERSION.SDK_INT}")
 7
 8//                if (Build.VERSION.SDK_INT >= Build.VERSION_CODES.Q) {
 9    photoUri = MediaStore.setRequireOriginal(photoUri)
10//                    val stream = contentResolver.openInputStream(photoUri)
11    val bitmap = contentResolver.loadThumbnail(photoUri, Size(width, height), null)
12    iv_preview.setImageBitmap(bitmap)
需要用 jni 处理图片
有的时候,你需要使用 ndk/jni 来处理文件,这个时候,可以用 openFileDescriptor 来完成这个事情
1val fileOpenMode = "r"
2val parcelFd = resolver.openFileDescriptor(photoUri, fileOpenMode)
3val fd = parcelFd?.detachFd()
修改其他项目创建的文件
需要捕获RecoverableSecurityException异常,并请求用户允许修改
官方原文如下:
Update other apps' media files Note: Expect the following behavior to take effect in a future beta release of Android Q. To modify a given media file that another app originally saved to an external storage device, catch the RecoverableSecurityException that the platform throws. You can then request that the user grant your app write access to that specific item.
照片的位置信息
一些照片在 Exif 中包含位置的敏感信息, 以前的话可以直接通过 MediaStore 的 query 方法从数据库中查到, 现在就不再可以了
如果需要这些元数据,需要请求用户同意, 需要ACCESS_MEDIA_LOCATION权限, 这个是一个 android-Q 的新权限
并调用setRequireOriginal()方法来获取对应的 Uri
官方给的示例如下:
1// Get location data from the ExifInterface class.
2val photoUri = MediaStore.setRequireOriginal(photoUri)
3contentResolver.openInputStream(photoUri).use { stream ->
4    ExifInterface(stream).run {
5        // If lat/long is null, fall back to the coordinates (0, 0).
6        val latLong = ?: doubleArrayOf(0.0, 0.0)
7    }
8}
可是我这里有报错的地方,我修改如下:
1contentResolver.openInputStream(photoUri).use { stream ->
2    ExifInterface(stream).run {
3        val floatArrayOf = floatArrayOf(0f, 0f)
4        val latLongResult = this.getLatLong(floatArrayOf)
5        Log.d(TAG, "latLng request $latLongResult latlng = ${floatArrayOf.toList()}")
6    }
7}
在加入权限的请求后我能够得到一个日志, 告诉我照片的经纬度
12019-05-20 17:02:01.436 19236-19236/top.kikt.camerax.scopedstorage D/MediaScanActivity: latLng request true latlng = [39.841603, 116.317417],
sdcard 目录结构
系统自带的 files 无法完整的看到目录结构, 我考虑使用 adb shell 命令来查看
1generic_x86:/sdcard $ ls
2Alarms  DCIM     Movies Notifications Podcasts
3Android Download Music  Pictures      Ringtones
1generic_x86:/sdcard $ cd DCIM
2generic_x86:/sdcard/DCIM $ ls
3Camera
4generic_x86:/sdcard/DCIM $ ls Camera/
5IMG_20190518_232111.jpg IMG_20190520_140142.jpg
6generic_x86:/sdcard/DCIM $
 1cd /sdcard/Android # 这一步应该是常规的数据
 2ls data/
 3com.android.calllogbackup         com.android.phone                    com.android.service.ims.presence      com.google.android.packageinstaller
 4com.android.camera2               com.android.printspooler             com.android.smspush                   com.google.android.partnersetup
 5com.android.carrierconfig         com.android.providers.blockednumber  com.android.stk                       com.google.android.sdksetup
 6com.android.cellbroadcastreceiver com.android.providers.calendar       com.android.vending                   com.google.android.setupwizard
 7com.android.chrome                com.android.providers.contacts       com.google.android.apps.docs          com.google.android.storagemanager
 8com.android.managedprovisioning   com.android.providers.telephony      com.google.android.apps.maps          com.google.android.videos
 9com.android.mms.service           com.android.providers.userdictionary com.google.android.gms                com.google.android.webview
10com.android.nfc                   com.android.se                       com.google.android.gsf                com.google.android.youtube
11com.android.ons                   com.android.service.ims              com.google.android.onetimeinitializer top.kikt.camerax.scopedstorage
1130|generic_x86:/sdcard/Android $ ls /sdcard/Android/data/top.kikt.camerax.scopedstorage/
2cache
3generic_x86:/sdcard/Android $ ls /sdcard/Android/data/top.kikt.camerax.scopedstorage/cache/
4abc.txt # 这个是代码第一步创建的那个文件
1generic_x86:/sdcard/Android $ ls /sdcard/Android/media
2com.android.calllogbackup         com.android.phone                    com.android.service.ims          com.google.android.onetimeinitializer
3com.android.carrierconfig         com.android.printspooler             com.android.service.ims.presence com.google.android.packageinstaller
4com.android.cellbroadcastreceiver com.android.providers.blockednumber  com.android.smspush              com.google.android.partnersetup
5com.android.chrome                com.android.providers.calendar       com.android.stk                  com.google.android.sdksetup
6com.android.managedprovisioning   com.android.providers.contacts       com.android.vending              com.google.android.setupwizard
7com.android.mms.service           com.android.providers.telephony      com.google.android.apps.maps     com.google.android.storagemanager
8com.android.nfc                   com.android.providers.userdictionary com.google.android.gms           com.google.android.webview
9com.android.ons                   com.android.se                       com.google.android.gsf           top.kikt.camerax.scopedstorage
这一步的话,应该是创建可以在卸载 app 后依然会保留的 media 部分
基本和前面说的沙箱,本应用的 media, 系统相册等进行了一一对应
后记
以上